Download latest version of verified & working Windows 10 driver for CH340, CH340G USB to Serial converter. Tested with Arduino, ESP2866, Wemos D1 and other boards.
Driver details
CH340, CH340G & CH341 (USB-SERIAL chip) V3.5
Driver Version = 2019-01-30, 3.5.2019.1
This file was scanned with VirusTotal on 2026-01-14 19:31:47 UTC.
SHA-256 Checksum: 3624cf160343c2bfcf8fff28b28b1ca42f10734943bc0517be8a61bfc0e353fd.
What is CH340 and Why Do You Need This Driver?
Have you ever bought an Arduino board online for $3 and wondered why it doesn’t work right away? The answer is simple: it uses a CH340 chip instead of the expensive FTDI chip found in official Arduino boards.
What Exactly is the CH340?
The CH340 (and its variants CH340G, CH340C, CH340E) is a USB to Serial converter chip made by a Chinese company called WCH.
Here’s what makes it popular:
- Super cheap – Costs less than $0.20 per chip (compare that to $4+ for FTDI chips!)
- Works well enough for hobbyist projects
- Widely used in budget Arduino clones, ESP8266 modules, and development boards
- Same functionality as expensive alternatives for basic use
Which Devices Use CH340?
You’ll find CH340 chips in tons of popular boards:
- Arduino clones – Arduino Nano, Pro Mini, Uno (non-official versions)
- ESP8266 boards – NodeMCU, Wemos D1 Mini, ESP-01 programmer boards
- ESP32 boards – Many development boards use CH340
- USB to TTL converters – Standalone programming modules
- 3D printer controllers – Some use CH340 for USB connection
If you bought your Arduino or ESP board from AliExpress, Amazon (third-party sellers), or eBay for under $5, there’s a 90% chance it has a CH340 chip.
How Do You Know You Need This Driver?
Windows won’t recognize your CH340 device without the proper driver. Here are the telltale signs:
🔴 Common symptoms:
- You plug in your Arduino and nothing happens
- Device Manager shows “Unknown Device” with a yellow exclamation mark
- You see “USB2.0-Serial” listed under “Other Devices”
- Arduino IDE doesn’t show any COM port in the Tools menu
- Upload fails with “Port not found” or “Access denied” errors
- The device connects then immediately disconnects in a loop
Installing the CH340 driver fixes all these issues in about 2 minutes!
Which Windows Versions Are Supported?
This driver works on:
- Windows 11 (latest)
- Windows 10 (all versions)
- Windows 8 / 8.1
- Windows 7 (SP1 and later)
Note: This guide focuses on Windows 10 and 11, which are the most common. The steps are nearly identical for Windows 7 and 8.
Quick Compatibility Check
Before we start, let’s make sure you actually need this driver:
✅ You NEED this driver if:
- Your Arduino/ESP board cost less than $10
- The board has a small rectangular chip near the USB port (that’s the CH340)
- Device Manager shows “USB2.0-Serial” as unknown
- You bought from budget sellers on AliExpress, eBay or Amazon
❌ You DON’T need this driver if:
- You have an official Arduino board (they use different chips)
- Your device already shows up as a COM port in Device Manager
- You’re using Mac or Linux (different drivers needed)
Now that you know what CH340 is and why you need the driver, let’s get it installed!
CH340 Windows 10 driver installation
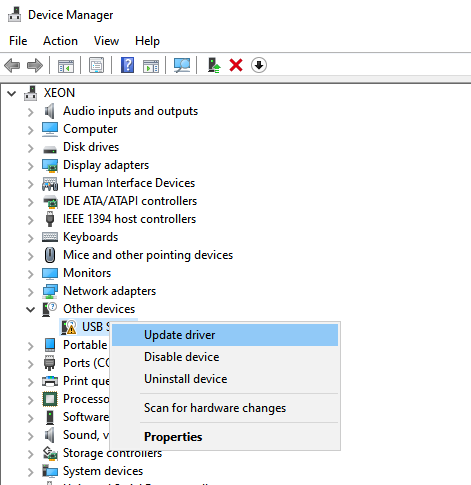
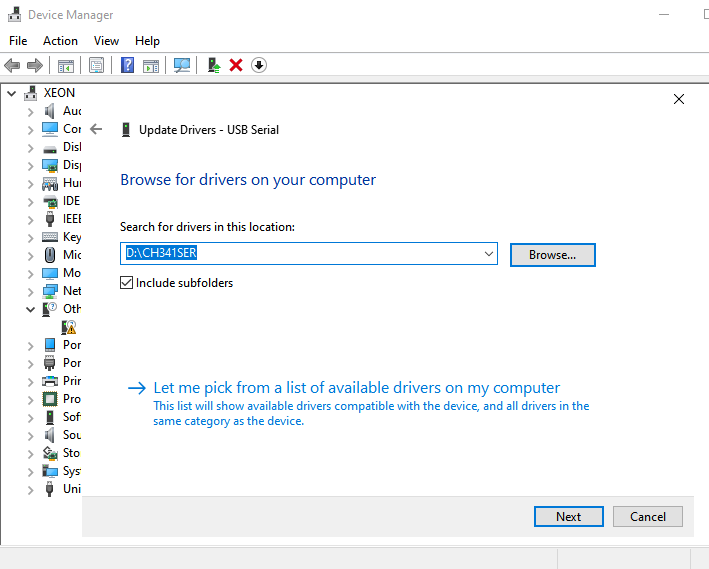
Open Device Manager – right mouse click on USB Serial, then left click Update Driver …
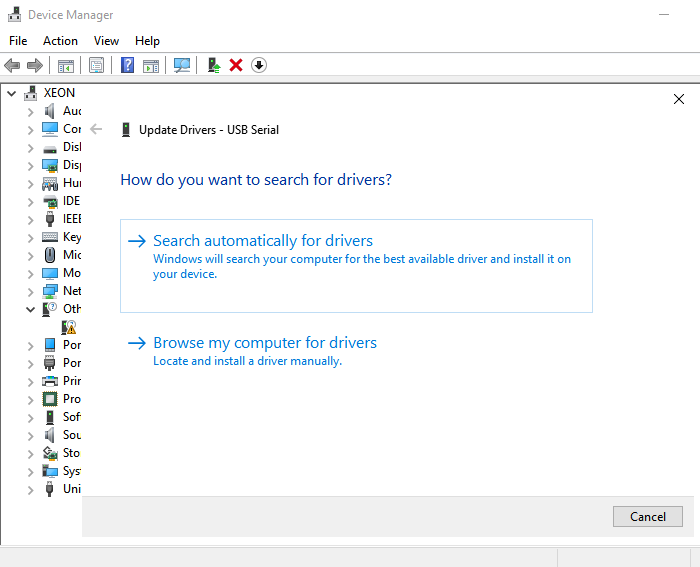
open the directory with downloaded & extracted CH341SER.zip driver
Finished, Close
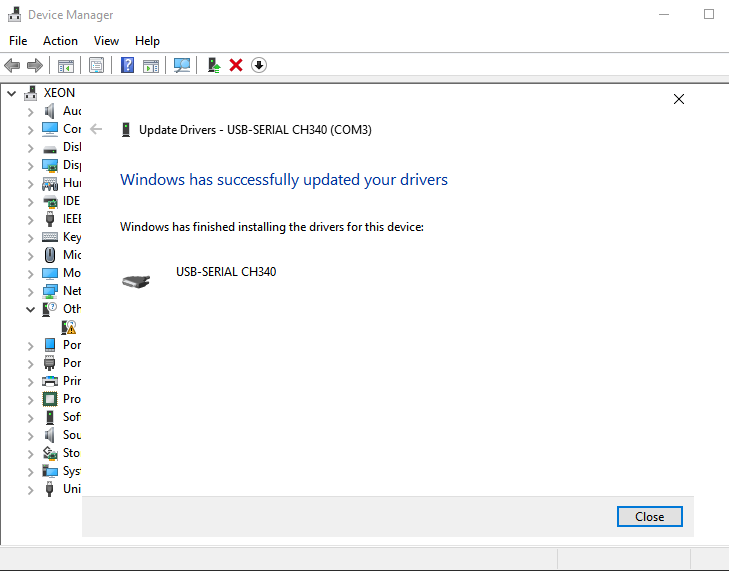
CH340 driver installed and working
How to Verify the Driver is Working Correctly
So the installation said “success” – but how do you know it’s actually working? Let’s test everything properly.
This is the most basic test:
1. Open Device Manager (Windows Key + X)
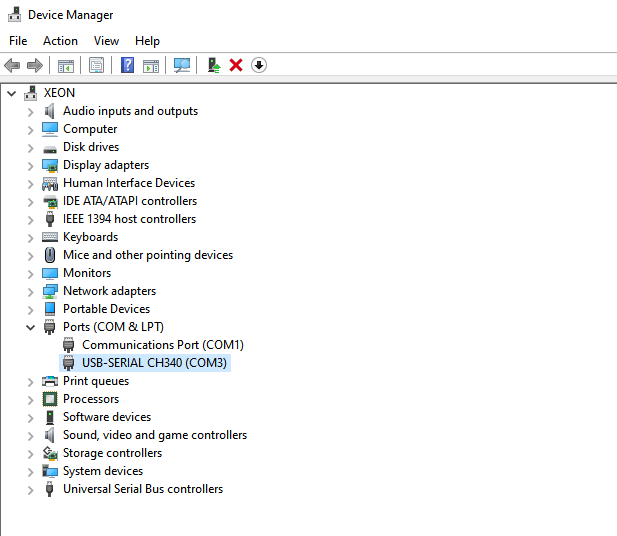
2. Expand “Ports (COM & LPT)”
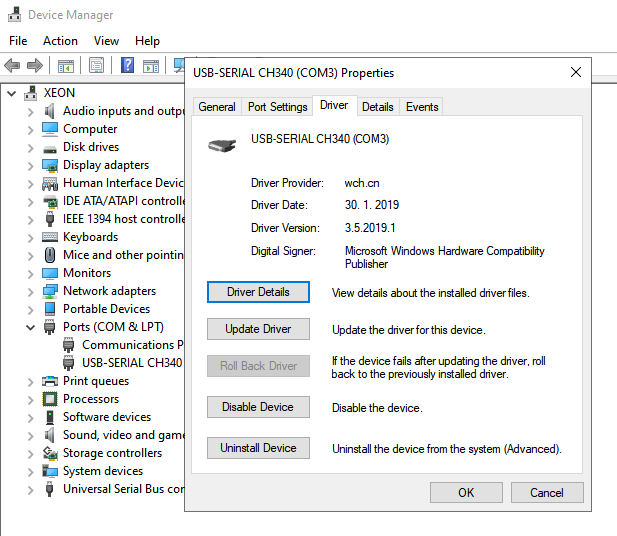
3. Your CH340 should appear as “USB-SERIAL CH340 (COM#)”
4. Right-click it → Properties
5. Check the “Device status” box – it should say: “This device is working properly”
If it says anything else, there’s a problem. Note down the exact error message and check the troubleshooting section.
Test 2: Plug and Unplug Test
This tests if Windows recognizes the device consistently:
1. Open Device Manager and expand “Ports (COM & LPT)”
2. Watch the list while you unplug your CH340 device
3. The COM port entry should disappear (you’ll hear the USB disconnect sound)
4. Plug it back in
5. The COM port entry should reappear (you’ll hear the USB connect sound)
6. Check that the COM number stays the same
What this tells you: If the device appears and stays stable, your driver is working correctly. If it appears then disappears repeatedly, see the troubleshooting section about power problems.
Test 3: Identify Your COM Port Number
You’ll need to know your COM port number for programming. Here’s how to find it:
Method 1: From Device Manager
- Device Manager → Ports (COM & LPT)
- Look at your CH340 entry
- It shows “USB-SERIAL CH340 (COM3)” – that number is your port
- Write it down or take a screenshot!
Method 2: From Arduino IDE
- Open Arduino IDE
- Go to Tools → Port
- You’ll see all available COM ports listed
- The one that says “CH340” or appears when you plug in the device is yours
Pro tip: If you have multiple CH340 devices, label each one with its COM number using a piece of tape. For example: “COM3 – NodeMCU” or “COM5 – Pro Mini”
Test 4: Loopback Test (Advanced Verification)
Want to test if your CH340 can actually send and receive data? Try this loopback test:
What you need:
- Your CH340 USB to serial converter (the standalone module, not connected to Arduino)
- One jumper wire
Steps:
1. Unplug your CH340 module from any Arduino or other devices
2. Take a jumper wire and connect TX pin to RX pin on the CH340 module – this is called a “loopback”
3. Plug the CH340 into your computer
4. Open Arduino IDE
5. Go to Tools → Serial Monitor
6. Set the baud rate to 9600 (dropdown at bottom-right)
7. Type something in the text box at the top, like “Hello”
8. Press Enter or click Send
Expected result: You should see “Hello” appear in the monitor window below! This proves your CH340 can send and receive data.
Why this works: With TX and RX connected together, anything the CH340 sends out (TX) immediately comes back in (RX). It’s talking to itself!
If this test fails, but Device Manager shows the driver installed, you might have a hardware problem with the CH340 module itself.
Test 5: Test with Actual Arduino Board
The ultimate test – can you upload code?
Simple test sketch:
1. Connect your Arduino (Pro Mini, Nano, etc.) to the CH340 using proper wiring (we’ll cover this in detail in the next section)
2. Open Arduino IDE
3. Paste this simple test code:
void setup() {
  pinMode(LED_BUILTIN, OUTPUT);  // Usually pin 13
}

void loop() {
  digitalWrite(LED_BUILTIN, HIGH);   // Turn LED on
  delay(1000);                        // Wait 1 second
  digitalWrite(LED_BUILTIN, LOW);    // Turn LED off
  delay(1000);                        // Wait 1 second
}
4. Select your board: Tools → Board → Arduino Pro or Pro Mini (or your specific board)
5. Select processor: Tools → Processor → ATmega328P (5V, 16MHz) or 3.3V version
6. Select your COM port: Tools → Port → COM# (your CH340’s number)
7. Click the Upload button (right arrow icon)
What should happen:
- Arduino IDE says “Compiling sketch…”
- Then “Uploading…”
- Progress bar reaches 100%
- Says “Done uploading”
- The LED on your Arduino starts blinking!
If it works: Congratulations! Your CH340 driver is perfectly installed and working!
If it fails: Don’t panic – check the troubleshooting section. Most upload problems are about wiring or wrong settings, not the driver.
What to Do If Verification Fails
If any of these tests failed, here are quick fixes to try:
❌ Device appears with error in Device Manager:
- Try Method 3 installation (manual driver selection)
- Check if Windows Update installed a wrong driver over yours
- See the troubleshooting section
❌ Device keeps disconnecting:
- Try a different USB cable
- Try a different USB port
- Try a powered USB hub
- Your device might be drawing too much power
❌ COM port doesn’t appear:
- Restart your computer
- Try unplugging all USB devices except CH340
- Check if another program is using the COM port
❌ Loopback test fails:
- Make sure TX and RX are actually connected with the jumper
- Try different baud rates (9600, 115200)
- Your CH340 hardware might be faulty
❌ Arduino upload fails:
- Check TX/RX wiring (very commonly swapped!)
- Verify board settings in Arduino IDE
- See the comprehensive troubleshooting section for upload errors
Once you’ve verified everything works, you’re ready to start using your CH340 for actual projects!
Uninstall Conflicting Drivers (If Needed)
Tried installing the CH340 driver before and it didn’t work? Old, incomplete, or wrong driver installations can cause problems.
When to uninstall old drivers:
- You previously installed a different version
- The device worked before but stopped working
- You see multiple “Unknown Device” entries in Device Manager
- Previous installation attempts failed
How to completely remove old drivers:
- Open Device Manager (Windows Key + X → Device Manager)
- Click View at the top → Select “Show hidden devices”
- Look for any entries related to CH340, even grayed-out ones
- Right-click each one → “Uninstall device”
- IMPORTANT: Check the box that says “Delete the driver software for this device”
- Click Uninstall
- Repeat for all CH340-related entries
- Unplug the device
- Restart your computer
Fresh start: After restarting, your system is clean. Now you can install the driver properly without conflicts.
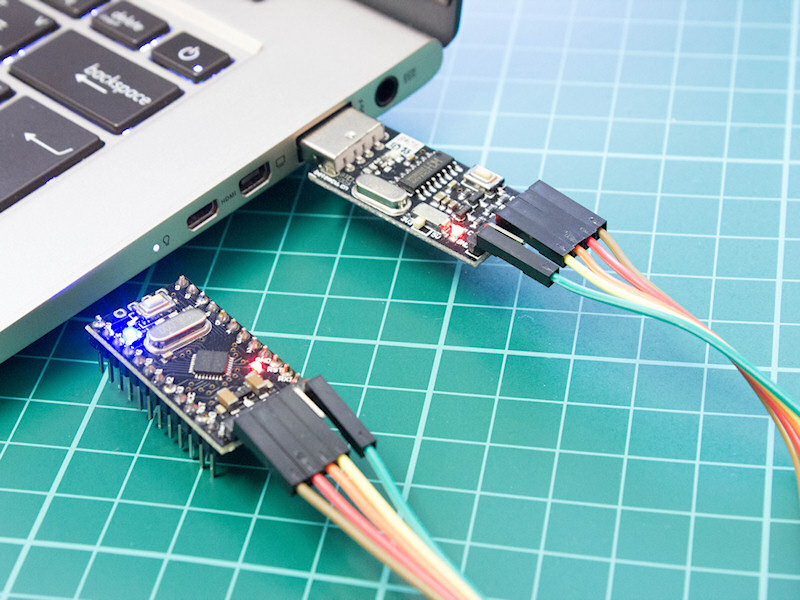
CH340G converter connection and pinout for programming